
Thursday, December 31, 2009


Wednesday, December 30, 2009


Tuesday, December 29, 2009


Monday, December 28, 2009

Sunday, December 27, 2009


Monday, December 21, 2009
Sunday, December 20, 2009
Christmas Face Painting Tips and Animal Painting Techniques
 As Christmas is approaching faster than Santa can harness the reindeer to his sledge, many of you will be already creating and practising your very own fabulous Christmas face painting creation. There will be those among you that would love to follow suit, but have yet to apply their first brushstroke.
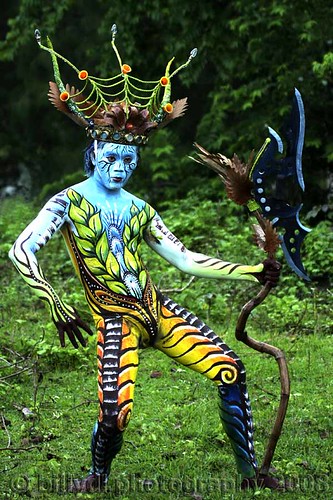
FIRST STEPS: Take things easy at first with simple to do designs. Cheek art is a perfect starting point with basic little patterns featuring holly, berries, snowflakes, stars, Christmas crackers, Christmas trees with a little bauble at the end of the branches, and even little faces. Remember that the theme is Christmas so red, white, green, silver and gold are essential colours. Painting animal markings on the cheeks, eyes and forehead can also look very effective, and because animal markings like tigers aren't straight you will get away with so much whilst perfecting your creation.
TIGER MARKINGS: Use a round brush with a pointed end and black paint. Tiger stripes are best done in groups of three. Always think big to small. Lay your brush down flat (for a thicker start) and while doing your stroke give it a very light wiggle and taper it off at the end. Each stroke is going to have a curved effect to it. Do a group of three one under the other. This effect would be ideal for cheeks with the markings starting on the outside working in towards the eyes. Doing a similar stroke on the forehead, a group of three on either side and tapering downwards towards the eyes would give a great look for an animal face painting.

FUR EFFECT: When trying to create a fur effect, use a medium-sized brush, working from the centre outwards. That way the edges taper off. Have a go on paper or a face painting practice pad first until you get to grips with the motion needed for your required effect.
ADVANTAGE OF SPONGES: These will play an important part in your face painting kit, being perfect for applying base coats, large areas of paint on the face and body, and great for blending colours. TIP make them go further by cutting them in half
COLOURS: Don't make the mistake that many learners make and rush out to buy every colour under the rainbow. All you need are your primary colours which are blue, yellow, red and black and white. From these you can mix any colour and shade you want, and it will keep costs down.

FAMILY AFFAIR: Use your family and friends to practise on, trying out different ideas. If you begin practising now, you'll be confident enough by Christmas to paint a whole face and there are some quite spectacular and highly popular choices to have a go at. The Ice Queen and animals will always be favourites along with the traditional Santa and Rudolph.
Christmas Face Painting Tips and Animal Painting Techniques
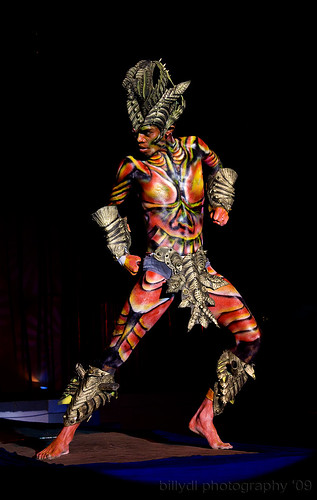
As Christmas is approaching faster than Santa can harness the reindeer to his sledge, many of you will be already creating and practising your very own fabulous Christmas face painting creation. There will be those among you that would love to follow suit, but have yet to apply their first brushstroke.FIRST STEPS: Take things easy at first with simple to do designs. Cheek art is a perfect starting point with basic little patterns featuring holly, berries, snowflakes, stars, Christmas crackers, Christmas trees with a little bauble at the end of the branches, and even little faces. Remember that the theme is Christmas so red, white, green, silver and gold are essential colours. Painting animal markings on the cheeks, eyes and forehead can also look very effective, and because animal markings like tigers aren't straight you will get away with so much whilst perfecting your creation.
TIGER MARKINGS: Use a round brush with a pointed end and black paint. Tiger stripes are best done in groups of three. Always think big to small. Lay your brush down flat (for a thicker start) and while doing your stroke give it a very light wiggle and taper it off at the end. Each stroke is going to have a curved effect to it. Do a group of three one under the other. This effect would be ideal for cheeks with the markings starting on the outside working in towards the eyes. Doing a similar stroke on the forehead, a group of three on either side and tapering downwards towards the eyes would give a great look for an animal face painting.
FUR EFFECT: When trying to create a fur effect, use a medium-sized brush, working from the centre outwards. That way the edges taper off. Have a go on paper or a face painting practice pad first until you get to grips with the motion needed for your required effect.
ADVANTAGE OF SPONGES: These will play an important part in your face painting kit, being perfect for applying base coats, large areas of paint on the face and body, and great for blending colours. TIP make them go further by cutting them in half
COLOURS: Don't make the mistake that many learners make and rush out to buy every colour under the rainbow. All you need are your primary colours which are blue, yellow, red and black and white. From these you can mix any colour and shade you want, and it will keep costs down.
FAMILY AFFAIR: Use your family and friends to practise on, trying out different ideas. If you begin practising now, you'll be confident enough by Christmas to paint a whole face and there are some quite spectacular and highly popular choices to have a go at. The Ice Queen and animals will always be favourites along with the traditional Santa and Rudolph.
Christmas Face Painting Tips and Animal Painting Techniques
As Christmas is approaching faster than Santa can harness the reindeer to his sledge, many of you will be already creating and practising your very own fabulous Christmas face painting creation. There will be those among you that would love to follow suit, but have yet to apply their first brushstroke.FIRST STEPS: Take things easy at first with simple to do designs. Cheek art is a perfect starting point with basic little patterns featuring holly, berries, snowflakes, stars, Christmas crackers, Christmas trees with a little bauble at the end of the branches, and even little faces. Remember that the theme is Christmas so red, white, green, silver and gold are essential colours. Painting animal markings on the cheeks, eyes and forehead can also look very effective, and because animal markings like tigers aren't straight you will get away with so much whilst perfecting your creation.
TIGER MARKINGS: Use a round brush with a pointed end and black paint. Tiger stripes are best done in groups of three. Always think big to small. Lay your brush down flat (for a thicker start) and while doing your stroke give it a very light wiggle and taper it off at the end. Each stroke is going to have a curved effect to it. Do a group of three one under the other. This effect would be ideal for cheeks with the markings starting on the outside working in towards the eyes. Doing a similar stroke on the forehead, a group of three on either side and tapering downwards towards the eyes would give a great look for an animal face painting.
FUR EFFECT: When trying to create a fur effect, use a medium-sized brush, working from the centre outwards. That way the edges taper off. Have a go on paper or a face painting practice pad first until you get to grips with the motion needed for your required effect.
ADVANTAGE OF SPONGES: These will play an important part in your face painting kit, being perfect for applying base coats, large areas of paint on the face and body, and great for blending colours. TIP make them go further by cutting them in half
COLOURS: Don't make the mistake that many learners make and rush out to buy every colour under the rainbow. All you need are your primary colours which are blue, yellow, red and black and white. From these you can mix any colour and shade you want, and it will keep costs down.
FAMILY AFFAIR: Use your family and friends to practise on, trying out different ideas. If you begin practising now, you'll be confident enough by Christmas to paint a whole face and there are some quite spectacular and highly popular choices to have a go at. The Ice Queen and animals will always be favourites along with the traditional Santa and Rudolph.
Saturday, December 19, 2009
Using Liquid Latex As Body Paint
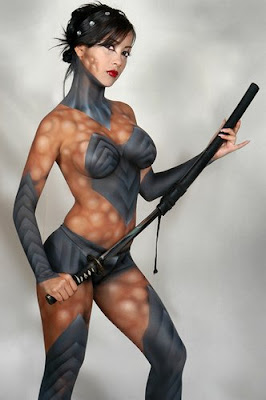
 The main advantages of using liquid latex over other kinds of body paint are duration and durability. Other body paints tend to rub off and smudge against fabric, often leaving dirty and possibly even stained clothing. Once liquid latex has dried on the skin it does not present these issues. Clothing will remain unblemished by the latex for as long as it is worn. Whilst perspiration and body heat may encourage the latex to separate from the skin slightly, the latex will not smudge or run but remain intact until the wearer removes it by simply tearing or peeling it away from the skin. Again, this does not leave a residue on the skin like many other body paints. Depending on your activities and the thickness of the applications, latex should last many hours before it begins to separate from the skin. If latex is painted entirely around body or body parts it will continue to cling to the body and can still be worn for an unlimited time. Generally, it can be worn out for an entire day or night, can be worn in water, and will last many hours through photo shoots, performances and many other activities.
There are however some minor disadvantages, nothing that should discourage the use of latex, more the need for a little common sense and preparation. Before applying latex to the body it is necessary to patch-test a small area of the skin to check for any allergic reactions. It is quite rare, most people are not allergic to latex, but a small percentage of users have reported skin irritation after coming into contact with this kind of body paint.
On occasions where liquid latex has been applied to the skin over hair it can be both difficult and painful to remove. Wet latex will bond permanently to hair as it does to fabric. The only way to remove latex with hair stuck to it is to pull it off, which of course also rips the hair off the skin. Anyone who has experienced body waxing will be familiar with the level of discomfort. The best preparation when applying liquid latex is to first remove hair from areas of the body to be painted. However, it is not always necessary as liquid latex can be removed from moderate amounts of body hair with little effort and minimum discomfort. Body hair may also be trimmed very short instead of shaving.

For the reasons stated above, children should be supervised by a responsible adult at all times when using this type of body paint.
Using Liquid Latex As Body Paint
The main advantages of using liquid latex over other kinds of body paint are duration and durability. Other body paints tend to rub off and smudge against fabric, often leaving dirty and possibly even stained clothing. Once liquid latex has dried on the skin it does not present these issues. Clothing will remain unblemished by the latex for as long as it is worn. Whilst perspiration and body heat may encourage the latex to separate from the skin slightly, the latex will not smudge or run but remain intact until the wearer removes it by simply tearing or peeling it away from the skin. Again, this does not leave a residue on the skin like many other body paints. Depending on your activities and the thickness of the applications, latex should last many hours before it begins to separate from the skin. If latex is painted entirely around body or body parts it will continue to cling to the body and can still be worn for an unlimited time. Generally, it can be worn out for an entire day or night, can be worn in water, and will last many hours through photo shoots, performances and many other activities.There are however some minor disadvantages, nothing that should discourage the use of latex, more the need for a little common sense and preparation. Before applying latex to the body it is necessary to patch-test a small area of the skin to check for any allergic reactions. It is quite rare, most people are not allergic to latex, but a small percentage of users have reported skin irritation after coming into contact with this kind of body paint.
On occasions where liquid latex has been applied to the skin over hair it can be both difficult and painful to remove. Wet latex will bond permanently to hair as it does to fabric. The only way to remove latex with hair stuck to it is to pull it off, which of course also rips the hair off the skin. Anyone who has experienced body waxing will be familiar with the level of discomfort. The best preparation when applying liquid latex is to first remove hair from areas of the body to be painted. However, it is not always necessary as liquid latex can be removed from moderate amounts of body hair with little effort and minimum discomfort. Body hair may also be trimmed very short instead of shaving.
For the reasons stated above, children should be supervised by a responsible adult at all times when using this type of body paint.
Using Liquid Latex As Body Paint
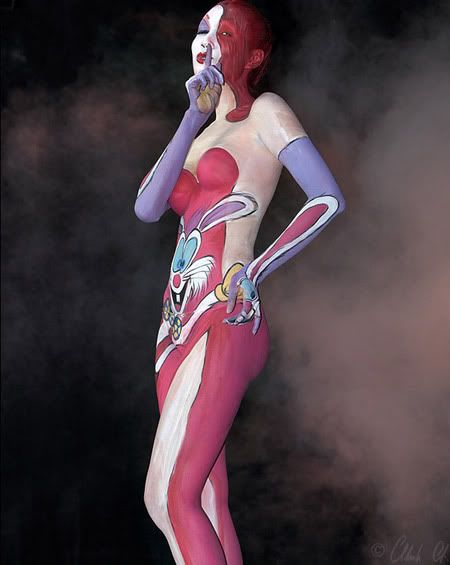
The main advantages of using liquid latex over other kinds of body paint are duration and durability. Other body paints tend to rub off and smudge against fabric, often leaving dirty and possibly even stained clothing. Once liquid latex has dried on the skin it does not present these issues. Clothing will remain unblemished by the latex for as long as it is worn. Whilst perspiration and body heat may encourage the latex to separate from the skin slightly, the latex will not smudge or run but remain intact until the wearer removes it by simply tearing or peeling it away from the skin. Again, this does not leave a residue on the skin like many other body paints. Depending on your activities and the thickness of the applications, latex should last many hours before it begins to separate from the skin. If latex is painted entirely around body or body parts it will continue to cling to the body and can still be worn for an unlimited time. Generally, it can be worn out for an entire day or night, can be worn in water, and will last many hours through photo shoots, performances and many other activities.There are however some minor disadvantages, nothing that should discourage the use of latex, more the need for a little common sense and preparation. Before applying latex to the body it is necessary to patch-test a small area of the skin to check for any allergic reactions. It is quite rare, most people are not allergic to latex, but a small percentage of users have reported skin irritation after coming into contact with this kind of body paint.
On occasions where liquid latex has been applied to the skin over hair it can be both difficult and painful to remove. Wet latex will bond permanently to hair as it does to fabric. The only way to remove latex with hair stuck to it is to pull it off, which of course also rips the hair off the skin. Anyone who has experienced body waxing will be familiar with the level of discomfort. The best preparation when applying liquid latex is to first remove hair from areas of the body to be painted. However, it is not always necessary as liquid latex can be removed from moderate amounts of body hair with little effort and minimum discomfort. Body hair may also be trimmed very short instead of shaving.
For the reasons stated above, children should be supervised by a responsible adult at all times when using this type of body paint.
Friday, December 18, 2009


Monday, December 14, 2009


Sunday, December 13, 2009

Subscribe to:
Comments (Atom)